


Resources
Outdoor Skills
106 bite-size wilderness tutorials — the kind of things you want in your head before you need them. Each skill is one screen: three to six steps, a tip, and any real warnings.
7 skills
First Aid
5 minStop severe bleeding
You have minutes. Direct pressure first, tourniquet if it doesn't stop.
- Press hard directly on the wound with any cloth — shirt, bandana, hand. Do not lift to look.
- Elevate the injury above the heart if possible.
- Hold pressure for at least 10 uninterrupted minutes.
- If blood soaks through, add material on top — do not remove the first layer.
- If bleeding won't stop on a limb, apply a tourniquet 2-3 in above the wound, tight enough that the bleeding stops. Note the time.
Warning: A properly applied tourniquet hurts. Once on, it stays on until a medical professional removes it.
American College of Surgeons — Tourniquet

First Aid
5 minStop a blister before it forms
The moment you feel a hotspot, stop. Two more miles turns hotspot into open wound.
- At the first burn or rub, take the boot off. Don't wait for camp.
- Dry the foot and sock completely.
- Cover the hotspot with athletic tape, moleskin, or duct tape — the patch must extend well past the friction zone.
- Smooth every wrinkle in the sock before re-lacing.
- Recheck within the hour; adjust before it goes through.
Tip: If the blister has already formed, don't pop it in the field. Ring it with padding and leave it intact.
Mowser — Why You Get Blisters
First Aid
5 minImprovise a tourniquet for life-threatening bleeding
A tourniquet is the fastest way to stop massive limb bleeding when direct pressure fails or is impossible.
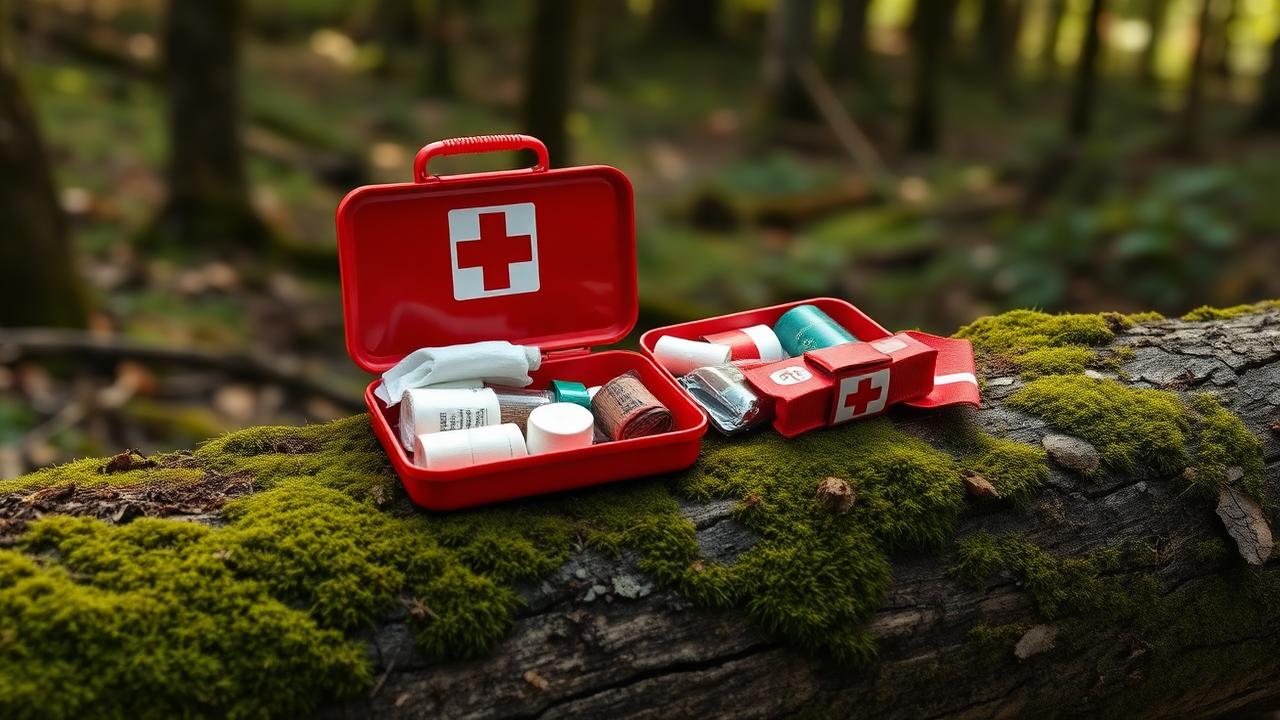
- Use a wide (2+ inches), non-elastic strap — belt, folded cloth, or webbing. Never use paracord or wire alone — they cut tissue.
- Place the tourniquet 2–3 inches above the wound, closer to the torso, but never over a joint.
- Tighten until bright red bleeding fully stops — this will hurt; that is expected and necessary.
- Secure the windlass (stick, knife, pen) so it cannot unwind.
- Write the time of application on the patient's forehead or the tourniquet itself. Do not remove until qualified medical care is available.
Warning: A tourniquet is for life-threatening bleeding only. Use direct pressure and wound packing first for anything less than arterial spray or amputation.
First Aid
15 minClean a wound in the field
Infection risk is high in the outdoors. Cleaning a wound within the first hour dramatically improves outcomes.
- Wash your own hands with soap and clean water before touching the wound.
- Irrigate the wound aggressively with clean drinking water — 1 liter minimum for anything larger than a scratch, delivered under pressure (from a squeezed bag, syringe, or bottle with a small hole in the cap).
- Remove visible debris with clean tweezers if possible; scrub deeply embedded dirt with clean cloth or gauze.
- Cover with a clean, dry dressing — sterile if available, or the cleanest cloth you have.
- Change dressings daily and check for infection signs: expanding redness, warmth, pus, red streaks, or fever.
Warning: Never close a heavily contaminated wound in the field. Cover it and let it drain — a closed dirty wound abscesses far worse than an open clean one.
First Aid
20 minManage a sprained ankle in the backcountry
A sprained ankle can strand you if handled wrong. Support early and you can often walk out on it.
- Sit, elevate, and cool the ankle for 15–20 minutes with cold water, snow, or a wet bandana — this reduces swelling that will otherwise lock the joint.
- Assess: if you can bear weight cautiously without a grinding sensation or extreme pain, it's likely a sprain rather than a fracture.
- Support with a figure-8 wrap: run cloth or an elastic bandage under the arch, across the top of the foot, around the back of the ankle, and back across in an X pattern.
- Re-lace the boot firmly enough to stabilize the ankle but not tight enough to cut circulation. Check toes for warm color regularly.
- Walk out slowly using a trekking pole or stout stick on the injured side. Rest and re-cool at every break.
Warning: Numbness, severe deformity, inability to bear any weight, or grinding sounds mean a possible fracture. Splint in place and get help rather than walking on it.

First Aid
20 minSplint a limb in the field
A good splint immobilizes the joints above and below an injury, turning a painful fracture into a walkable problem.
- Check circulation, sensation, and movement before and after splinting.
- Find rigid material: tent poles, trekking poles, sticks, rolled magazines, or a sleeping pad folded around the limb.
- Pad between the splint and the skin with clothing, foam, or grass to prevent pressure sores.
- Secure the splint with bandanas, belts, or strips of cloth — snug but not so tight that fingers or toes turn pale.
- Immobilize the joint above and below the break, not just the bone itself.
Warning: If the limb is deformed, cold, numb, or blue below the injury, treat it as a medical emergency and evacuate.
Instructor Strange — How To Make A Leg Splint
First Aid
5 minRemove a tick safely
The faster a tick comes off whole, the lower the risk of disease transmission.
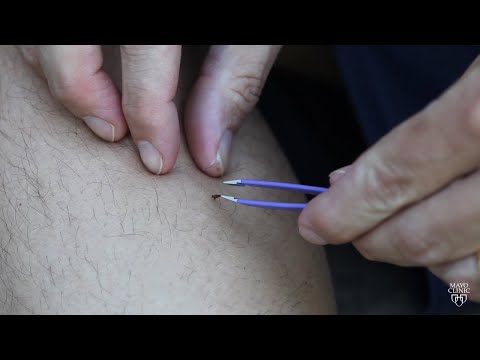
- Use fine-tipped tweezers or a dedicated tick remover.
- Grasp the tick as close to the skin as possible, near the mouthparts.
- Pull upward with steady, even pressure. Do not twist, jerk, or squeeze the body.
- If the mouthparts break off, try to remove them with tweezers; if not, leave them and let the skin heal.
- Clean the bite with soap and water or an alcohol wipe.
Warning: Never burn a tick, smother it in petroleum jelly, or twist it. These methods increase the chance of regurgitation and infection.
Mayo Clinic — Tips to Best Remove Ticks
Educational reference only. Wilderness conditions change fast — practice in low-stakes settings, take a certified wilderness first-aid course, and confirm regional regulations (fire, fishing, foraging, snaring) before you rely on any of these skills in the field.